Recently, methods of accessing the Internet through VPN networks have become increasingly popular. This allows you to maintain maximum confidentiality, as well as visit web resources blocked for various reasons by providers. Let's see what methods you can use to set up a VPN on a computer running Windows 7.
Setting up a VPN in Windows 7, like most other tasks in this OS, is carried out using two groups of methods: by using third-party applications and using only the internal functionality of the system. Next, we will consider in detail these methods for solving the problem.
Method 1: Third Party Programs
Let's immediately look at the algorithm for setting up a VPN using third-party applications. We will do this using the example of the popular Windscribe software. This program is good because, unlike other free analogs, it can provide a fairly high-quality connection. But the limit of transmitted and received data is limited to 2 GB for anonymous users and 10 GB for those who indicated their email.
- After downloading, run the program installer. In the window that opens, you will be offered two installation options:
- Express installation;
- Selective.
- The installation procedure will start.
- After its completion, the corresponding entry will be displayed in the installer window. If you want the application to launch immediately after closing the window, leave a checkmark in the checkbox "Launch Windscribe". Then click "Complete".
- Next, a window will open asking if you have a Windscribe account. If this is your first time installing this program, then click "No".
- The browser that is assigned by default in the OS will launch. It will open the official Windscribe website in the registration section.
In field "Choose Username" enter the desired account. It must be unique in the system. If you choose a non-unique login, you will have to change it. You can also generate it automatically by clicking on the icon in the form of arrows forming a circle on the right.
Into the fields "Choose Password" And "Password Again" enter the same password that you created. Unlike a login, it does not have to be unique, but it is advisable to make it reliable, using generally accepted rules for composing such code expressions. For example, combine letters in different cases and numbers.
In field "Email (Optional)" enter your email address. This is not necessary, but if this field is filled in, you will receive as much as 10 GB of Internet traffic instead of the basic 2 GB.
Once everything is filled in, click "Create Free Account".
- Then go to your email inbox, find the email from Windscribe and sign in. Inside the letter, click on the element in the form of a button "Confirm Email". By doing this, you will confirm your email and receive an additional 8 GB of traffic.
- Now close your browser. Most likely, you will already be logged into Windscribe using the current account you just registered. But if this is not so, then in the window with the inscription "You already have an account" click "Yes". In the new window, enter your registration data: login and password. Next click "Entrance".
- A small Windscribe window will open. To start the VPN, click on the large round button on the right side of it.
- After a short period of time during which activation is carried out, the VPN will be connected.
- By default, the program selects the best location with the most stable connection. But you can choose any other available option. To do this, click on the element "Connected".
- A list will open with a list of locations. Those marked with an asterisk are only available for a paid premium account. Select the name of the region of the country through the IP of which you want to present yourself on the Internet.
- A list of settlements will open. Select your desired city.
- After this, the VPN will be reconnected to your chosen location and the IP will be changed. You can easily see this right in the main window of the program.


As you can see, the procedure for setting up a VPN and changing the IP address using the Windscribe program is quite simple and convenient, and specifying your email during registration allows you to increase the amount of free traffic several times.
Method 2: Built-in functionality of Windows 7
You can also set up a VPN using exclusively the built-in tools of Windows 7, without installing third-party software. But to implement this method, you must be registered on one of the services that provide access services for the specified type of connection.
- Click "Start" followed by transition to "Control Panel".
- Click "Network and Internet".
- Open the directory "Control center…".
- Go to “Setting up a new connection...”.
- Displayed "Connection Wizard". Select the option that involves solving the problem by connecting to the workplace. Click "Further".
- Then a window for selecting a connection method opens. Click on the element that suggests your connection.
- In the window that appears in the field "Internet address" Enter the address of the service through which the connection will be made, and where you registered in advance. Field "Destination Name" determines what this connection will be called on your computer. You don’t have to change it, but you can replace it with any option convenient for you. Check the checkbox below "Don't connect now...". After that click "Further".
- In field "User" Enter the login for the service you are registered with. In the form "Password" enter the login code and click "Create".
- The next window will display information that the connection is ready for use. Click "Close".
- Back at the window "Control Center", click on the element on the left side "Change settings…".
- A list of all connections created on the PC will be displayed. Find a VPN connection. Right-click on it ( RMB) and select "Properties".
- In the shell that appears, move to the tab "Options".
- Uncheck the checkbox here "Enable domain...". It should be checked in all other checkboxes. Click "PPP Settings...".
- In the window interface that appears, uncheck all checkboxes and click "OK".
- After returning to the main connection properties window, move to the section "Safety".
- From the list "VPN Type" stop by position "Tunnel Protocol...". From the dropdown list "Data Encryption" select an option "Optional...". Also uncheck the checkbox "Microsoft CHAP Protocol...". Leave other parameters in default state. After completing these steps, click "OK".
- A dialog box will open warning you that if you use the PAP and CHAP protocols, encryption will not occur. We have specified universal VPN settings that will work even if the service providing the corresponding services does not support encryption. But if this is critical for you, then register only with the external service that supports the specified function. In the same window, click "OK".
- Now you can start a VPN connection by simply left-clicking on the corresponding item in the list of network connections. But it will be inconvenient to go to this directory every time, and therefore it makes sense to create a launch icon on "Desktop". Click RMB by VPN connection name. From the list that appears, select "Create shortcut".
- A dialog box will prompt you to move the icon to "Desktop". Click "Yes".
- To start the connection, open "Desktop" and click on the icon you created earlier.
- In field "Username" Enter the login of the VPN service, which you already entered at the stage of creating the connection. In field "Password" Enter the appropriate code expression to enter. To always avoid having to enter the specified data, you can check the checkbox "Save username...". To start the connection, click "Connection".
- After the connection procedure, the network location settings window will open. Select a position in it "Public Network".
- The connection will be completed. Now you can send and receive data over the Internet using a VPN.


You can set up a network connection via VPN in Windows 7 using third-party programs or using only the system functionality. In the first case, you will definitely need to download the application, but the actual settings procedure will be as simple as possible; you will not have to look for any proxy services that provide the corresponding services. When using the built-in tools, you do not need to download anything, but you will need to first find and register on a special VPN service. In addition, you will still need to perform a number of settings, which are much more complicated than when using the software method. So you need to choose for yourself which option suits you best.
The Internet has firmly entered our lives, and if earlier, in the years of the dominance of analog modems, in order to access the Internet it was necessary to take into account both the volume of traffic and the connection time, but today an unlimited Internet connection has become the norm. That is, if there is no Internet at any time and in any “volume,” then this is already something out of the ordinary. Moreover, if previously the availability of unlimited Internet was considered a de facto standard for corporate networks, today it has already become the norm for end users. As the Internet develops, the conceptual model of its use also changes. More and more new services are appearing, such as video on demand and VoIP, peer-to-peer file-sharing networks (BitTorrent), etc. are developing. Recently, the organization of virtual private networks (VPN) over the Internet with the ability to organize remote access to any computer as part of this network has become very popular. How this can be done will be discussed in this article.
Why is this necessary?
Organization of VPN networks over the Internet or within a local network has many use cases: network games on the Internet bypassing game servers (just like games over a local network), creating a network closed from outsiders for transmitting confidential information, the ability to remotely and securely manage computers (full control over a remote PC), organizing secure access for employees on a business trip to corporate network resources, communication via a virtual network of individual offices (local area networks).
The traditional approach to deploying such a virtual private network is that a VPN server (usually based on Linux OS) is installed and configured in the corporate network and remote users access the corporate network via VPN connections.
However, this approach is not applicable when the user needs to gain remote access to his home computer. It is unlikely that a situation where a separate VPN server is installed at home can be considered normal. However, don't despair. The task of creating a VPN network is solvable and even a novice user can do it. For this purpose, there is a special Hamachi program, which can be freely downloaded from the Internet (http://www.hamachi.cc/download/list.php). What is especially pleasing is the presence of its Russified version, so that any user can master the program.
Hamachi 1.0.2.2
So, Hamachi (current version - 1.0.2.2) is a program that allows you to create a virtual private network (VPN) over the Internet and connect several computers in it. After creating such a network, users can establish VPN sessions among themselves and work on this network in the same way as on a regular local (LAN) network with the ability to share files, remotely administer computers, etc. The advantage of a VPN network is that it is completely protected from unauthorized intervention and is invisible from the Internet, although it exists on it.
Hamachi must be installed on all computers that are to be connected to a virtual private network.
The virtual network is created using a specialized Hamachi server on the Internet. To connect to this server, ports 12975 and 32976 are used. The first port (12975) is used only for establishing a connection, and the second - during operation. However, ordinary users are unlikely to need such detailed information.
After a virtual network is created between selected computers using the Hamachi server, information exchange between VPN clients occurs directly, that is, without the participation of the Hamachi server. The UDP protocol is used to exchange data between VPN clients.
Program installation
The Hamachi program is installed on computers with the Windows 2000/XP/2003/Vista operating system. There are also console versions of the program for Linux and Mac OS X. Next, we will look at installing and configuring the program using the Windows XP operating system as an example.
Installing the Hamachi program is quite simple and does not cause problems (especially considering that the interface of the installation wizard launched is Russian). After you begin installing the program on your computer, the installation wizard starts, prompting you to agree to the license agreement, select a folder to install the program (Fig. 1), create an icon on the desktop, etc.
Among the useful optional features that can be activated during the installation process of the program are the automatic launch of Hamachi when the computer boots and the blocking of vulnerable services for Hamachi connections (Fig. 2). In the latter case, the Windows File Sharing service for the Hamachi virtual network adapter will be blocked. As a result, other users of the VPN network will not have access to files and folders that are shared on your computer. At the same time, these files and folders will remain accessible to ordinary users of the local network, to connect with whom a VPN connection is not used.
Rice. 1. The Hamachi installation wizard allows you to specify the folder
to place the program, create an icon on the desktop
and select the optional option to automatically start the program
when the computer boots
In addition to blocking the Windows File Sharing service, blocking vulnerable services for Hamachi connections also blocks remote access to certain Windows services that are frequently attacked. Accordingly, if you use the Hamachi program to connect to reliable clients that you trust, then it is better to disable the option to block vulnerable services.

Rice. 2. The Hamachi installation wizard allows you to block
vulnerable services for Hamachi connections
At the last stage, the installation wizard will ask you to choose which version of the program to install: basic version or Premium. Hamachi comes in two versions. The basic version is free, and the Premium version, which has more advanced features, is paid for. Note that for most users the free basic version of the program is quite sufficient (we will talk about the detailed differences between the basic version and the Premium version a little later), but the standard approach is as follows: first the Premium version is installed for 45 days (free), and after this period it automatically there is a transition to the basic version.
After installing and launching the Hamachi program on your computer, if this is the first time you have installed the program, a short guide to Hamachi will launch, which describes how to work with the program.
First launch of the program
When you launch the program for the first time, your account will be created. At this stage, you need to set the computer name under which it will be visible to other users of the VPN network (Fig. 3).

Rice. 3. Specifying the name of the computer under which
it will be visible to other users of the VPN network
When the computer name is specified, the program establishes a connection to the Hamachi database server and requests an IP address, which will be assigned to the Hamachi virtual network adapter and will be used later to establish a VPN connection. Each Hamachi client is assigned an IP address in the range 5.0.0.0/8 (subnet mask 255.0.0.0), which is not generally reserved for Internet use. These ranges reserved for private use on local networks include the following ranges: 10.0.0.0/8 (range from 10.0.0.0 to 10.255.255.254), 172.16.0.0/12 (range from 172.16.0.0 to 172.31.255.254) and 192.168.0.0 /16 (range from 192.168.0.0 to 192.168.255.254). However, the 5.0.0.0/8 range has been reserved for more than 10 years by the IANA (Internet Assigned Numbers Authority - an American organization that manages IP address spaces) and is not used as public (external) Internet addresses. Thus, the range 5.0.0.0/8, on the one hand, refers to the range of external (public) Internet addresses, that is, the possibility is excluded that the IP address assigned to you is already used in your local network (in local networks only those reserved for private application of an IP address), and on the other hand, these addresses are not yet occupied by anyone.
After assigning you an IP address from the range 5.0.0.0/8, it becomes a kind of identifier for your computer in a virtual private network. This IP address is assigned to the Hamachi virtual network adapter. So, if you type the ipconfig / all command on the command line, then in addition to the network interface settings of the real network adapter (which is physically present in your PC), you can find that another Hamachi virtual Ethernet adapter has appeared with a MAC address and IP address assigned to it , subnet mask, gateway IP address, etc. (Fig. 4).

Rice. 4. After the first launch of the program, the virtual network adapter
Hamachi is assigned an IP address from the range 5.0.0.0/8 and configured
network interface
So, after the Hamachi program has configured the virtual network adapter, you can start working with the program.
At this point, your computer is not yet a member of any virtual private network, so the first step is to connect to an existing virtual private network or create a new VPN network.
Working with the program
The program interface is very simple (Fig. 5). There are only three function buttons: “on/off”, network menu button and system menu button.

Rice. 5. Program interface
Hamachi is very simple -
only three function buttons
To create a new VPN network or connect a computer to an existing one, click on the network menu button and select the appropriate item (Fig. 6).

Rice. 6. The network menu button allows you to
create a new VPN network or join
computer to an existing one
Joining a PC to and leaving an existing virtual network
If you need to connect your computer to an existing virtual network and you know its name and password (if one is used), then in the network menu select Login to an existing network... Next, a window will open in which you need to set the network name and password (Fig. 7).

Rice. 7. Adding a computer
to an existing virtual network
After this, the name of the network and a list of computers connected to it (except yours) will appear in the program window - Fig. 8.

Rice. 8. After connecting the computer
to the virtual network in the program window
a list of connected ones is displayed
computers to her
If there is a green dot or star next to the computer name, this means that a connection with the computer has been established. A flashing green dot indicates that the connection is in the process of being established. A light circle around the green dot indicates that information is being exchanged with this computer.
The worst thing is when there is a yellow dot next to the computer name - this means that for some reason a direct connection to it could not be established. If the name of the computer is displayed in yellow, this means that the connection with it has been lost.
The appearance of a blue dot indicates that a direct connection to the computer could not be established and communication is carried out through the Hamachi server. The problem is that in this case the communication channel with the computer has very low bandwidth and long delays.
If the name of the computer and the dot next to its name are displayed in gray, this means that the computer, although connected to this virtual network, is inaccessible (for example, the PC is turned off, there is no Internet connection, or the Hamachi program is not running).
In order to leave the network, just right-click on its name and select the item from the drop-down list Disconnect or Leave the network. In the first case, you only temporarily leave the network and the list of computers connected to it remains visible to you. In the second case, to enter the network you will have to repeat the entire procedure of connecting the computer to the existing network.
Creating a new network and deleting the created network
If you need to create a new virtual network, then in the network menu select Create a new network... A window will open in which you need to specify the name of the network being created and the password that other users will use to join this network (Fig. 9).

Rice. 9. Create a new VPN network
After creating a new network, you can connect user computers to it. If the network is created by you, then you are its administrator and receive full control over it, which other users are deprived of. It is important to remember that the created network can only be managed from the computer on which it was created. More precisely, the network can only be managed from a computer that is assigned exactly the same virtual IP address as the one that was used to create the virtual network. Why is this remark so important? Imagine this: you installed Hamachi and created a new VPN network. Then you completely uninstalled (including all configuration files) the Hamachi program and after some time installed it again. You will be assigned a new virtual IP address, but using it, you will no longer be able to control the VPN network you created earlier.
If you are a network administrator, you can delete it. To do this, right-click on the network name and select the item from the drop-down list Delete. Note that when a network is deleted, all connections between its other users are completely destroyed.
Other actions with network computers
If you have joined a network, you can perform the following actions on the computers connected to it:
- accessibility check;
- folder browsing;
- sending a message;
- copying the address;
- blocking;
- setting the label.
In order to perform one of them, right-click on the computer name and select the appropriate item from the drop-down menu (Fig. 10).

Rice. 10. List of possible actions
with the selected computer on the network
When selecting an item Check availability the usual ping command will be executed to the address of the corresponding computer.
Paragraph Browse folders allows you to access shared folders on your computer.
Paragraph send a message makes it possible to exchange messages between individual computers on a network, similar to how it is done in ICQ.
Paragraph Copy address inserts the IP address of the selected computer into the clipboard, which is convenient if you want to use this address in other programs (for example, remote administration).
Paragraph Block allows you to temporarily block the selected computer, that is, your VPN channel with it will be blocked and information exchange will be impossible.
Paragraph Set label allows you to select the format for displaying computer attributes on the network. By default, the computer's IP address and its name are displayed. You can choose to display only the computer name or only the IP address.
Setting up the program
In order to access the program settings, you must click on the system menu button and select the item Settings…(Fig. 11).

Rice. 11. Accessing settings
programs
After this a window will open Status and configuration, which allows you to make detailed settings of the program (Fig. 12).

Rice. 12. Detailed program configuration window
Actually, everything here is quite simple, and detailed comments are unlikely to be needed, so we will simply list the features that can be implemented in the configuration window. So, in this window you can change the computer name, make detailed connection settings, set the program startup type, block or unblock vulnerable Windows services, block new network members and implement other, less significant options. Among the important features, we note the disabling of encryption when transferring data between individual computers on the network. In order to do this, you need to click on the icon Window and in the group Appearance check the box Show "Advanced..." per menu item(Fig. 13).

Rice. 13. Adding an Advanced item...
to the drop-down menu
After this, if you right-click on the name of a computer connected to the network, an item will appear in the drop-down menu Advanced… If you select it, a window will open Tunnel Configuration, which allows you to change the VPN tunnel settings. To disable encryption at Encryption you need to select a value Off. In this case, data from your computer will be transferred to the selected PC in unencrypted form. However, in the opposite direction, the data will be transmitted encrypted. To completely disable encryption for a VPN tunnel between two computers, it must be disabled on both computers.
Note that encryption should be disabled only in exceptional cases, since the encryption procedure itself is unlikely to affect traffic. The fact is that traffic will be determined by the bandwidth of your Internet channel, and not by the use or lack of encryption. Only if a VPN tunnel is formed between computers within the same local network and its throughput is about 100 Mbit/s, the use of encryption can slightly reduce the maximum transfer speed (to 70-80 Mbit/s).
Conclusion
Hamachi is a powerful tool that allows you to create VPN networks very quickly. Note that it was originally created to allow users to play online games by bypassing game servers. However, the possible scenarios for using this program are much wider. Thus, having created a virtual network and connected computers to it, you can, using standard remote administration programs, gain remote access to any computer in the virtual network, since each computer in such a network has its own dedicated IP address.
At the same time, it should be noted that it is not always possible to establish a direct connection between individual computers. And despite the fact that the manufacturer’s website claims that the program easily “breaks through” routers and NAT devices, in reality everything is not so optimistic. The documentation for the program states that in 5% of cases a direct connection between individual computers cannot be established, however, it seems to us that this figure is clearly underestimated. The real situation is this: if we are talking about connecting two computers that are assigned a dynamic or static public IP address, then there are no problems. That is, if you have only one computer with Internet access at home and you need to connect to a user who also has one computer with Internet access, then there will be no problems. As practice shows, there are no problems establishing a connection between a user’s computer with a dynamic or static public IP address assigned to it and a computer on a local network protected by a router. However, if a connection is established between two computers belonging to different local networks protected by routers, then problems are possible and it is not a fact that a direct connection will be established. That is, a connection can be established, but most likely it will not be direct, but through the Hamachi server. Accordingly, the speed of such a communication channel will be very low and there will be little use from such a connection. For example, in your home, Internet access is achieved using a wireless router, that is, your computer is part of the home local network and is assigned an IP address from the range of addresses reserved for private use, and a public address is assigned to the WAN port of the router through which you go online. If you are trying to establish a connection with another computer that is also part of the local network (for example, with a work computer in the office or with a user’s computer who has a local network deployed at home and uses a router), then in most cases problems arise.
The Hamachi User's Guide describes how you can avoid these problems. To do this, it is suggested to use a fixed (rather than dynamic) UDP port and implement port forwarding on the router. However, as practice shows, port forwarding or using a demilitarized zone in the router does not always help.
This instruction demonstrates how to connect to the VPN Gate relay server using the L2TP/IPsec VPN client built into the Android mobile operating system.


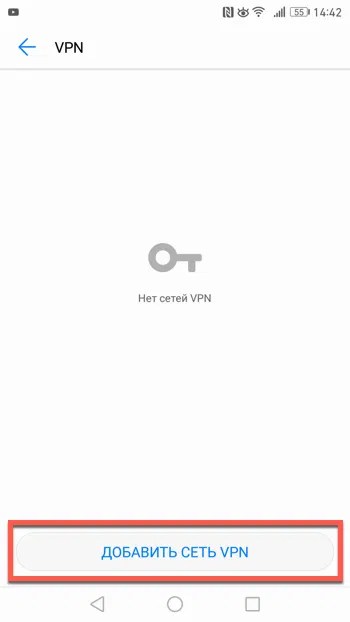


- Go to the application Settings.
- In the network settings section, click "More" and select the "VPN" option.
- Click the button.
- The screen for setting up a new VPN connection opens. Enter a custom name in the name field, for example, "vpn" and select the connection type L2TP/IPSec PSK.
- On this screen you need to enter either the host name or the IP addresses of the server from the pool of open VPN Gate servers http://www.vpngate.net/en/.
- Open the list of public relay servers and select the VPN server you want to connect to.

Important information
- Copy the DDNS host name (an ID that ends with ".opengw.net") or IP address (the numeric value xxx.xxx.xxx.xxx) and enter it in the “Server Address” field on the configuration screen.
Note
- Scroll down and check the “Advanced” checkbox if available.
- Introduction vpn in the IPSec Shared Key field.
- In the Forwarding Routes field, enter 0.0.0.0/0 . Make sure you entered the value for this field correctly. Otherwise, you will not be able to establish a connection to the VPN server.
- After that, click the “Save” button.
2. Starting a VPN connection
- You can establish a new connection to the VPN server at any time. Open your VPN settings and you will see the following list.
- Enter vpn in the “Username” and “Password” fields upon first use. Check the “Save credentials” checkbox. Click the button to establish a VPN connection
- Once a VPN connection is established, the corresponding entry from the VPN list will have the status Connected. Your Android device may display a notification to activate your VPN. Click on the message to view the status of the current connection.
3. Internet without restrictions
ip8.com
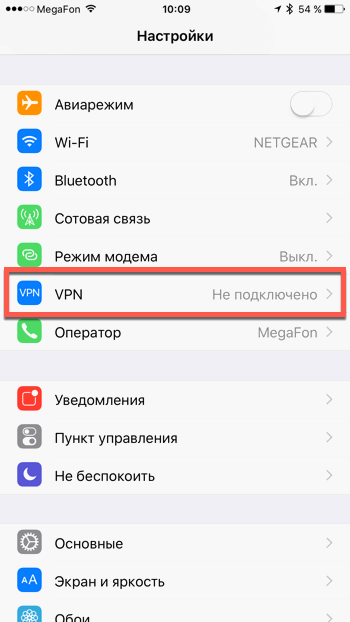
This instruction demonstrates how to connect to the VPN Gate relay server on iPhone/iPad using the L2TP/IPsec VPN client built into iOS.


1. Pre-configuration
- From the iPhone/iPad home screen, select the app Settings.
- Select an option VPN(or go to General > VPN), then click Add VPN configuration.
- On the Settings page, select Type > L2TP and add the connection name in the field Description, for example "VPN Gate".
- Next on this screen you need to enter either the host name or the IP addresses of the server from the pool of open VPN Gate servers http://www.vpngate.net/en/ (for the L2TP/IPsec column Windows, Mac, iPhone, Android No client required in the list of servers must be checked).
- Open the list of open relay servers and select the VPN server you want to connect to.
Important information
For the L2TP/IPsec Windows, Mac, iPhone, Android No client required column, the list of servers must have a checkmark that indicates support for the custom L2TP/IPsec protocol.
- Copy the DDNS hostname (the ID that ends with ".opengw.net") or IP address (the numeric value xxx.xxx.xxx.xxx) and enter it in the field Server on the configuration screen.
Note: It is recommended to use the DDNS name - you can continue to use it even if the corresponding DDNS IP address changes in the future. However, in some countries you may not be able to use a DDNS hostname, in which case you must use an IP address.
- Enter vpn in the Account, Password, and Shared Key fields, then click Finish.
2. Starting a VPN connection
- You can establish a new connection to the VPN server at any time by selecting the required configuration in the settings menu VPN and setting the switch Status to the "On" position.
- iOS shows a "VPN" indicator in the top bar when a VPN connection is established.
- By going to the configuration, you can get the following information: assigned IP address and connection time.
3. Internet without restrictions
Once the connection is established, all network traffic will go through the VPN server. You can also go to ip8.com to view your global IP address. You will be able to see your web-visible location, which will be different from your actual location.
When connected to a VPN, you will be able to visit blocked websites and use blocked applications.
Found a typo? Highlight and press Ctrl + Enter
This article provides step-by-step instructions for creating VPN connections on Microsoft Windows XP.
Virtual private network (VPN) technology allows you to connect segments of one network using another network, such as the Internet. This is achieved through tunneling, which is the creation of a tunnel through which data is transmitted over the Internet or other public network. This ensures the security and other features of private networks. Although VPN tunnels transfer data over the Internet, from the user's perspective it appears as if data is being transferred between two networks over a dedicated private network (VPN).
Not many people know that in Windows XP it is possible to create a VPN server! The article is suitable for setting up a VPN server in other operating systems - Windows 7, Windows Vista, Windows Server 2003. In the latter, you will not need to set up a remote access and routing service.
General information about VPN
VPN technology allows you to connect to a private network (such as an office network) using resources on a public network (such as the Internet).
It combines the benefits of dial-up connections with the ease and flexibility of Internet connections. Using an Internet connection allows you to connect to resources located around the world, as well as connect to your office network by establishing a local line connection with any Internet service provider. If the office network and home computer use a high-speed Internet connection (for example, using a cable modem or DSL technology), then a data exchange channel can be established between them, the throughput of which will be many times greater than the throughput of a connection via an analog modem.
Virtual private networks provide data encryption and authentication, which ensures the confidentiality of data sent over the Internet and allows only authorized users to connect to the network. To ensure data security, Windows XP uses PPTP and L2TP tunneling protocols. During the operation of these protocols, tunnels are created that provide high security for data transferred between computers over the Internet.
VPN technology also allows you to use a public network to create secure communication channels with different companies or branches of the same company. From the user's point of view, a VPN connection over the Internet acts as a dedicated WAN link.
Setting up a VPN server in Windows XP
Launching the New Connection Wizard
Start => Control Panel => Network Connections
File => New Connection
Click Next

Selecting the type of serial connection
select Establish a direct connection to another computer
Further

Setting additional connection parameters

Ignore devices for incoming connections
If you have a modem or LPT then ignore and click next

Setting up an incoming connection to a virtual private network (VPN)
Allow virtual private connections!
Further

VPN user permissions
Click the add button

Adding a new user
We fill in all fields. The new user is a VPN user; it will not be possible to log into the computer using this login. A user created through this window can only create a VPN connection.

User selection
make sure that there is a checkmark next to our new user!!

Selecting network programs
Select \"Internet protocol TCP/IP\"
and click the properties button

Setting up incoming TCP/IP calls
Check the box \"Allow callers access to the local network!\"
put a dot \"specify TCP/IP addresses explicitly\"
enter as in the picture!
We check the number of available addresses, if more is needed, then increase the last digit of the second field!
press the OK button

Completing the New Connection Wizard


Congratulations, you have just set up your own VPN server on windowsXP!
To establish a connection, follow these steps:
1. Use one of the following methods.
. Click the button Start, select item Connection and click the new connection icon.
. If a connection shortcut has been added to your desktop, double-click it.
2. If you are not currently connected to the Internet, Windows will prompt you to connect to the Internet.
3. Once connected to the Internet, the VPN server will ask for a name and password. Enter your username and password and click the button Connect. Once connected, remote network resources can be accessed as local network resources.
4. To disconnect from the VPN server, right-click the connection icon and select Disable.
Note. If you cannot access remote network shares by computer name, use the remote computer's IP address to establish a connection using the UNC path (\\\\\\share). Add an entry to the Windows\\System32\\Drivers\\hosts file that matches the remote server's name to its IP address. The computer name can then be used in a UNC connection (server_name_resource).
Troubleshooting VPN connections
Troubleshooting VPN connections typically involves contacting your ISP, VPN server administrator, and the manufacturer of your router or firewall.
The connection to the VPN server cannot be established and one of the following error messages or similar messages appears.
678: The remote computer is not responding.
930 The authentication server did not respond to authentication requests within the allotted time.
800: The VPN connection could not be established.
623 The system could not find a phone book entry for this connection.
720: A connection to the remote computer cannot be established.
To resolve this issue, use one of the following methods:
Before connecting to the VPN server, establish an Internet connection.
For more information about troubleshooting Internet connection problems in Windows XP, see the following articles in the Microsoft Knowledge Base.
(http://support.microsoft.com/kb/314067/) Troubleshooting TCP/IP connections in Windows XP
(http://support.microsoft.com/kb/314095/) How to determine the source of the error when you have problems connecting to servers on the Internet
If your Internet connection is working fine, but the connection to the VPN server is not established and you receive error 623, see the following Microsoft Knowledge Base article:
(http://support.microsoft.com/kb/227391/) Error message: "Error 623: The system could not find a phone book entry for this connection" when connecting to a VPN (This link may refer to content in whole or in part on English language)
If your Internet connection is working fine, but the connection to the VPN server is not established and you receive error 720, see the following Microsoft Knowledge Base article:
(http://support.microsoft.com/kb/314869/) Error 720: There are no PPP management protocols configured
If you still cannot connect to the VPN server, there may be errors in its configuration. Contact your VPN server administrator.
If you are a VPN server administrator, see the following Microsoft Knowledge Base articles for more information about VPN server configuration.
(http://support.microsoft.com/kb/308208/) Installing and Configuring a Virtual Private Network Server on Windows Server 2000 (This link may indicate all or part of the content in English)
(http://support.microsoft.com/kb/162847/) Troubleshooting PPTP Connections in Windows NT 4.0 (This link may indicate all or part of the content in English)
(http://support.microsoft.com/kb/299684/) Error message: “Error 930; The authentication server did not respond to authentication requests in a timely manner" (This link may refer to content in whole or in part in English)
PPTP requires that all routers and personal firewalls between the VPN server and the VPN client (including the local computer firewall and the router used to connect to the Internet) have the following ports open.
VPN client ports: 1024-65535/TCP
VPN server port: 1723/TCP
VPN protocol: PPTP
IP 47 (GRE) must also be enabled.
For information about your firewall or router configuration and how to open the above ports and protocols, contact your router or firewall manufacturer, Internet service provider, or VPN server administrator.
Article taken from open sources: http://www.lanberry.ru/microsoft-windows/vpn_windows_nastrojka
Currently, in order to ensure communication between computers in the office, Virtual Private Network technology is actively used. allows not only to ensure reliable communication between corporate PCs, but also to provide all units of computer equipment with the best cryptographic protection. For this reason, you can be confident in the security of the transfer of corporate information, in the complete exclusion of third-party intrusion.
Setting up a VPN connection in different versions of Windows OS has differences.
It is very important to understand that setting up a VPN creates a new dedicated zone. All technical devices, including scanners and printers, will be visible to every user connected to the VPN. Every attempt by an outsider to penetrate the corporate network will be accompanied by absolute failure.
Of course, it is simply impossible for an ignorant user to connect Windows 7, 8, 10 to a VPN. First of all, it is very important to saturate yourself, first of all, with a sufficient portion of theoretical knowledge regarding the features of various operating systems.
If you have the slightest knowledge of computers, but are actively trying to figure out how to set up a VPN, we recommend that you familiarize yourself with our recommendations, and then, strictly following them, sequentially perform each step we have outlined. In this case, we can guarantee you a positive result.
To connect to the VPN network, first click on the “Start” shortcut located at the bottom right. When the secondary menu opens, select the Control Panel option.

After this, it is important for you to go to the network settings. To make such a transition, find the desired parameter. In this case, it all depends on what type of display you have previously selected. Even if you didn’t choose it yourself, it means that it was chosen independently by the operating system or by the person who originally installed Windows on your computer.
You can easily switch categories if you wish. This kind of switch is located at the top of the window on the left side.

So, if the “Browse by category” option is set there, look for the “Network and Internet” line and click on it. If the “Classic style display” option is selected, then it is important to find the line “Network and Sharing Center”.
So, after making these transitions, you will be able to seamlessly visualize the “Set up a new connection or network” sentence. Just click on it with the left mouse button, you will immediately go to a new page on which you will be asked to create a new connection to the network.

If you decide to connect your PC to a VPN network, then select the “Workplace Connection” offer, which is often fourth on the list. Next, you just have to strictly follow all the advice that appears, but also be sure to take into account some of the nuances that arise as a result of installing different versions of the operating system.
Connecting to a virtual network is carried out only after installing a kind of VPN server, which can perfectly serve as one of the corporate computers. It is this VPN server that will control access to all other computers included in the corporate network space you created.
Of course, Windows itself will not be able to perform the “magic” manipulations that provide you with a successful corporate network. In this case, your participation will be required, which involves making certain settings.
ADVICE. Of course, it is difficult to figure out how to set up a VPN on your own, so we recommend that you do not break through an impenetrable wall, but carefully study our recommendations on how to connect to a VPN server if different versions of the operating system are installed on your PC.
Settings in Windows XP
If Windows XP is installed on your computer, click on the “Start” button, find “Control Panel” in the list that opens, go to it. After performing these simple manipulations, a window will open, on the left side of which the “New Connection Wizard” will be located, activate it, just run it. In the new window that opens, in the second position there will be the parameter that we will need to use.
Click on the line “Connect to a network at your workplace”, and then go to the line “Connect to a virtual private network”.

Now the connection wizard will confidently guide you to your desired goal, only recommending that you enter some information. In particular, he will initially ask you to come up with and enter the name of the corporate network you are creating. Of course, no one limits the flight of fancy, so the name can be anything. Next, the connection wizard will ask you to register the server. If it was decided to use one of the computers as a server, then it is better to enter the IP address of this PC in this field.
At the final stage, the wizard will automatically create a shortcut to the corporate network space you created. It wouldn’t hurt to make some additional changes, so double-click on the shortcut that appears to bring up a dialog box in which all the necessary settings are made.

There will be four tabs in this dialog box, go to one of them “Security”, select “Advanced (Custom Settings)”. Next, all that remains is to carefully study all the proposals and choose the acceptable parameters for your corporate network.
Settings in Windows 8
If Windows 8 is installed on your PC, then the algorithm of actions will not just be different, but as automated as possible. Of course, if you own a PC with Windows 8, you may be relieved that everything will be so easy to implement, but this does not mean that you can ignore our recommendations. One wrong step and you won't be able to successfully connect between corporate computers.
At the bottom of the screen on the right side, in the part where the clock is located, you can easily find the network status icon; in appearance it resembles a monitor. Right-click on this shortcut. After this, a new window will open in which you will find the “Network and Sharing Center” option. After clicking on this option, a new shortcut “Create a new connection or network” will appear, click on it and confirm that your PC has a direct connection to the Internet.

The Connection Wizard will also ask you to enter a name for your environment, and will also prompt you to make changes to various options if necessary. In this case, you can make additional network security settings, including:
- data encryption;
- password verification protocol;
- access parameters.
You can contribute whatever you consider necessary. This completes setting up a VPN network in Windows 8.
Settings in Windows 7
If your computer comes with the Windows 7 or 10 operating system, then you are also somewhat lucky. Even if you are a beginner, but fearless user who took the risk of following the route we described in order to install a VPN network, we can rejoice in you that everything will certainly work out for you.
ADVICE. Connecting to a VPN network on a PC with Windows 7 or 10 is quite simple and fast; you just need to follow the prompts that appear on the screen. Once the connection is established, you also need to make some useful changes.
In Windows 7 and 10, there is a shortcut near the clock indicating the connection status to various networks. If you click on this shortcut with the left mouse button, a list of all connections that can be considered as a possible option for connecting to the Internet or a public network will immediately open.

Among this list you can find the name of your VPN network, select it, and immediately after that the “Connect” button will appear. By clicking on this button, you will have the opportunity to make some changes to the parameters.
Carefully read the security, login, and data encryption settings that Windows 10 offers in this case, and check the checkboxes next to the settings that are most important to you.
So, if you set out to connect several computers running Windows XP, 7, 8 and 10 to the corporate network, do not hold back your technical impulses. You can do everything if you carefully study the recommendations, and also make changes to the settings without undue haste, reading the suggestions of the network setup wizard more than once, but even 10 times, in order to understand why and what specific actions need to be taken.